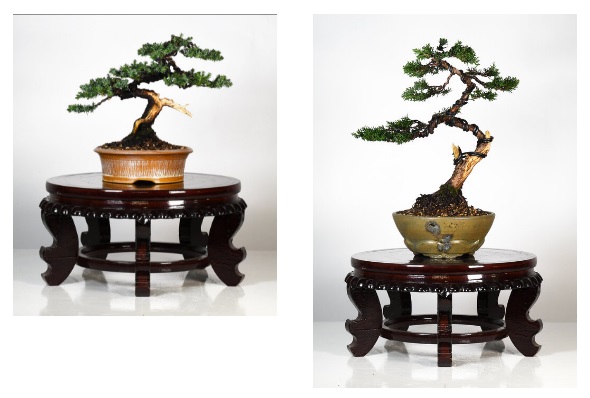
The Origins of Jins and Sharis
In nature these occur naturally without the aid of human intervention on junipers. There is a variety of a mountain juniper called a nezu and the natural jins and sharis are made by a blight fungus, which belongs to the family of mould that causes athlete’s foot and this was discovered over 250 years ago. While the jins and sharis on shimpaku (sargent’s juniper) that we mainly use, are attributed to falling rocks on the cliffs and precipices and/or to the exposure to the wind and snow for years on end.

Deadwood bonsai techniques, like jins and sharis, are methods that create, shape, and preserve dead wood on a living bonsai. They enhance the illusion of age which we try to achieve on all or most of our trees, especially trees like pines and junipers. These techniques can enhance the tree’s character significantly.
A ‘jin’ is a bare-stripped part of a branch and a ‘shari’ is a barkless part of a trunk. These techniques are almost exclusively used on evergreen trees, as creating a jin or shari on deciduous trees often looks unrealistic (deadwood on a deciduous tree often rots away over time and eventually the tree will die). Usually, jins can be seen on the top of a tree and the shari runs up the front of the trunk.
After applying these applications to the tree, you must let them dry out before applying lime sulphur to preserve it. Lime sulphur usually makes the de-barked branch look stark white which some people like and some don’t. If you don’t like the stark whiteness, you can add a few drops of Japanese Sumo ink (available at all art shops) to it and to me it gives a more realistic look as would be seen in nature. Otherwise, the stark whiteness can look a bit unnatural.
The “split-trunk” method is where a special tool (a trunk splitter) is used to divide an unusually straight main trunk that does not improve the look or direction of the tree. The trunk is thus split in half all the way down the middle and then carefully each ‘branch’ is covered in budding tape as tightly as possible to keep it waterproof while healing, then a bicycle inner tube which is split into strips is tied and stretched over the budding tape. The ‘bandaged’ tree is then placed in a sheltered position and the foliage is watered a few times in a day to help stop the shock.
Then with all this protection on the two new ‘trunks’ they can be heavily wired into whatever position you desire, thus making the style of the tree to your particular design. Warning– this method is best done when the sap is not running or is slowing down, say in mid-late autumn, as the tree could ‘bleed’ to death.
This technique is not often seen but when done properly you can achieve incredible designs from a very ordinary straight tree.
If you don’t want one single trunk, the method of splitting the trunk but not all the way up to the top, will give you enough movement in a somewhat stiffish trunk so that when you wire it, more movement can be achieved e.g. to give a literati more flexibility in a very straight tall thin trunk.
It is important to split the trunk right down the middle of whatever method you choose as this will not kill the tree! Remember when we were children when our fathers would put huge bolts through a big horizontal branch of a tree to secure our homemade swings? They were there for years with no damage to the tree at all!
