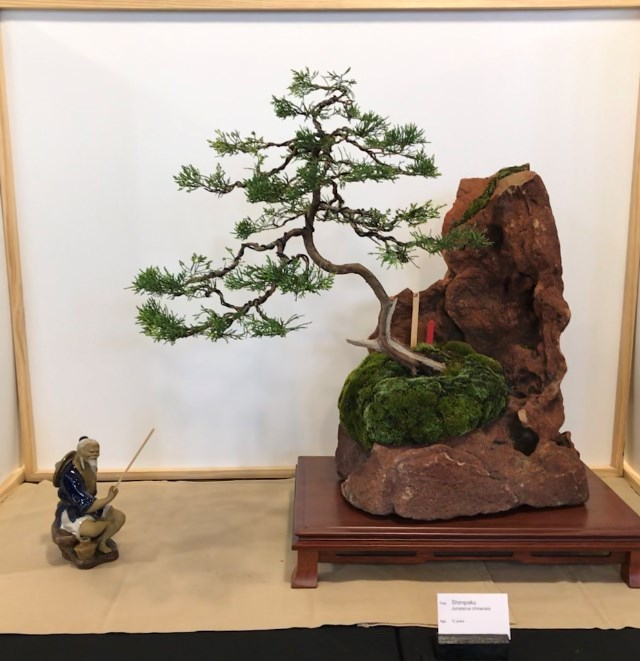
Andrew did a fantastic demonstration at September’s meeting, using an enormous rock that once resided in an aquarium and a variegated juniper that had he had styled in a master class with Yannick Kiggen (Belgium) at this year’s Bonsai Week at the National Arboretum. Andrew’s aim for this demonstration was to lift both the tree and setting to the next level.
Because he was using the rock as his container, Andrew’s first decision was to choose how to position the rock and then work out a way of fixing the roots to the rock as only when the tree is stable will it grow. In this case Andrew used wire attached to short lengths of chopstick that were fitted/wedged into holes drilled into the rock
He then made a small wall of muck comprised of clay, long fibre sphagnum moss and soil. Stiff enough to make the wall but still allow the roots to get into it. Andrew made the wall quite thick and warned that it would become very hard if it remained uncovered. To avoid this, a mixture of dry moss and dry sphagnum moss is rubbed through a 4mm sieve and then put onto the wall and sprinkled with water and six weeks later, ‘bingo moss!’ Andrew put drainage holes through the wall using a chopstick and then put drainage layer of 4-6mm zeolite so that there is an area for aeration- oxygen can come through the bottom as well as the top. He finds he has better results doing this particularly with conifers and pines.
The next step was to clean up the tree a little. The wire from its first styling in Canberra had been removed earlier. Junipers have their strength in their branches so removing 20-30% of its foliage and root pruning is OK but any more is very risky. Andrew removed wispy bits, weak branches and things going the wrong way stating that they were a drain on the tree but warned about too much pinching. This juniper had pushed out new growth using energy stored from last autumn but if this new growth is continually pinched eventually the tree has nothing to give (energy deficient) and the branch dies. Better to wait until new growth hardens off and then cut it.
Wiring was next and Andrew cautioned to think about wire direction before applying it; if you want a branch to go down then wire over the top of the shoulder and if you want a branch to go up then wire under the shoulder. Use the length of the wire as leverage and keep the angle and the distance between the same. Andrew starts wiring at the bottom of the tree and works his way up with the aim to wire the whole tree for the best result.
Next the tree was taken out of its pot and the roots cut to fit into the rock. As the juniper’s ‘battery’ is in its foliage this kind of root prune is not a problem.
Finally a cone of potting mix (1 part pumice 2-4mm, 1 part zeolite 2-4mm and 1½ parts potting mix) was built in the centre of the reservoir and the juniper pushed down into it. The remaining area was filled with the mix and patted down. Using a chopstick gently in an anti-clockwise direction any remaining air pockets were removed. The tree was then tied into place.
With a little more work at home, this is the setting a couple of weeks later at the Central Coast Bonsai Show.
